ASSOCIATE-ANDROID-DEVELOPER Online Practice Questions and Answers
DRAG DROP
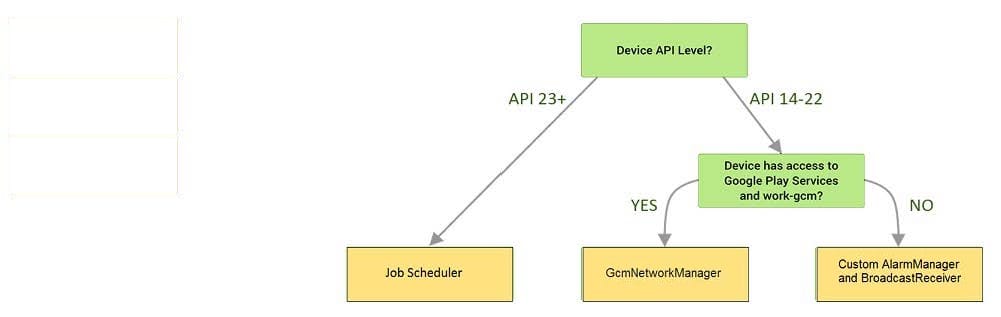
Under the hood WorkManager uses an underlying job dispatching service based on the following criteria. You need to move services to the correct places.
Select and Place:

The easiest way of adding menu items (to specify the options menu for an activity) is inflating an XML file into the Menu via MenuInflater. With menu_main.xml we can do it in this way:
A. override fun onCreateOptionsMenu(menu: Menu): Boolean {menuInflater.inflate(R.menu.menu_main, menu)
return true
}
return true
}
B. override fun onOptionsItemSelected(item: MenuItem): Boolean {menuInflater.inflate(R.menu.menu_main, menu)
return super.onOptionsItemSelected(item)
}
C. override fun onCreate(savedInstanceState: Bundle?) {super.onCreate(savedInstanceState)setContentView(R.menu.menu_main)
}
For example, we have a BufferedReader reader, associated with the json file through InputStreamReader. To get a file data we can do this:
A. var line: String?try {while (reader.readLine().also { line = it } != null) {
builder.append(line)
}
val json = JSONObject(builder.toString())
return json
} catch (exception: IOException) {
exception.printStackTrace()
} catch (exception: JSONException) {
exception.printStackTrace()
}
B. var line: JSONObject ?try {while (reader.readJSONObject ().also { line = it } != null) {
builder.append(line)
}
val json = JSONObject(builder.toString())
return json
} catch (exception: IOException) {
exception.printStackTrace()
} catch (exception: JSONException) {
exception.printStackTrace()
}
return json
} catch (exception: IOException) {
exception.printStackTrace()
} catch (exception: JSONException) {
exception.printStackTrace()
}
C. var line: String?try {while (reader.readLine().also { line = it } != null) {
builder.append(line)
}
val json = JSONObject(builder.toString())
return json
} catch (exception: RuntimeException) {
exception.printStackTrace()
} catch (exception: ArrayIndexOutOfBoundsException) {
exception.printStackTrace()
}
What is demonstrated by the code below?
// RawDao.kt@Daointerface RawDao {
@RawQueryfun getUserViaQuery(query: SupportSQLiteQuery?): User?}
// Usage of RawDao
...
val query =
SimpleSQLiteQuery("SELECT * FROM User WHERE id = ? LIMIT 1",
arrayOf
A. A method in a Dao annotated class as a raw query method where you can pass the query as a SupportSQLiteQuery.
B. A method in a Dao annotated class as a query method.
C. A method in a RoomDatabase class as a query method.
Once your test has obtained a UiObject object, you can call the methods in the UiObject class to perform user interactions on the UI component represented by that object. You can specify such actions as: (Choose four.)
A. click() : Clicks the center of the visible bounds of the UI element.
B. touch() : Touch the center of the visible bounds of the UI element.
C. dragTo() : Drags this object to arbitrary coordinates.
D. moveTo() : Move this object to arbitrary coordinates.
E. setText() : Sets the text in an editable field, after clearing the field's content. Conversely, the clearTextField() method clears the existing text in an editable field.
F. swipeUp() : Performs the swipe up action on the UiObject. Similarly, the swipeDown(), swipeLeft (), and swipeRight() methods perform corresponding actions.
To run your local unit tests, follow these steps:
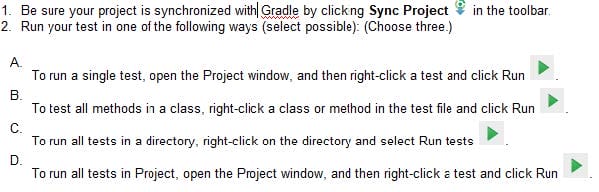
A. Option A
B. Option B
C. Option C
D. Option D
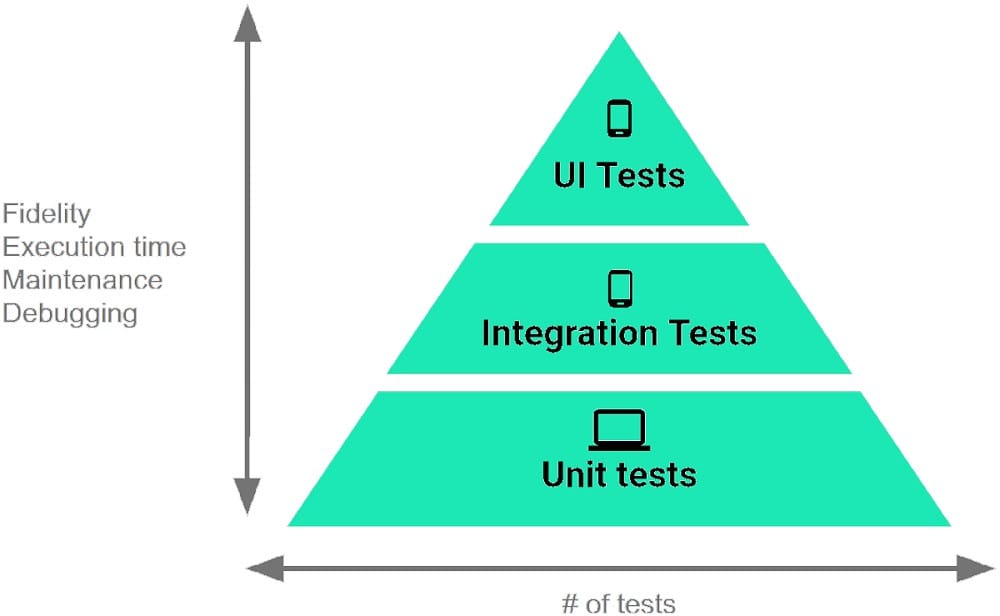
The Testing Pyramid, shown in the Figure, illustrates how your app should include the three categories of tests: small, medium, and large. Small tests are unit tests that :
A. validate your app's behavior one class at a time.
B. validate either interactions between levels of the stack within a module, or interactions between related modules.
C. validate user journeys spanning multiple modules of your app.
Filter logcat messages. If in the filter menu, a filter option "Show only selected application"? means:
A. Display the messages produced by the app code only (the default). Logcat filters the log messages using the PID of the active app.
B. Apply no filters. Logcat displays all log messages from the device, regardless of which process you selected.
C. Create or modify a custom filter. For example, you could create a filter to view log messages from two apps at the same time.
The Layout Inspector in Android Studio allows you to compare your app layout with design mockups, display a magnified or 3D view of your app, and examine details of its layout at runtime. When this is especially useful?
A. when your layout is built entirely in XML rather than runtime and the layout is behaving expectedly.
B. when your layout is built at runtime rather than entirely in XML and the layout is behaving unexpectedly.
SharedPreferences.Editor is an interface used for modifying values in a SharedPreferences object. All changes you make in an editor are batched, and not copied back to the original SharedPreferences until you call:
A. commit()
B. apply() C. commit() or apply()
If you are working with a Builder that creates a PeriodicWorkRequest to run periodically once within the flex period of every interval period. What statement is correct?
A. The repeat interval must be greater than PeriodicWorkRequest.MIN_PERIODIC_INTERVAL_MILLIS and the flex interval must be greater than PeriodicWorkRequest.MIN_PERIODIC_FLEX_MILLIS.
B. The repeat interval must be lower than or equal to PeriodicWorkRequest.MIN_PERIODIC_INTERVAL_MILLIS and the flex interval must be lower than or equal to PeriodicWorkRequest.MIN_PERIODIC_FLEX_MILLIS.
C. The repeat interval must be greater than or equal to PeriodicWorkRequest.MIN_PERIODIC_INTERVAL_MILLIS and the flex interval can be anything in relation to PeriodicWorkRequest.MIN_PERIODIC_FLEX_MILLIS.
D. The repeat interval must be greater than or equal to PeriodicWorkRequest.MIN_PERIODIC_INTERVAL_MILLIS and the flex interval must be greater than or equal to PeriodicWorkRequest.MIN_PERIODIC_FLEX_MILLIS.
Choose the most correct statement.
A. Android is a closed source, Linux-based software stack created for a wide array of devices and form factors.
B. Android is a closed source, Windows-based software stack created for a wide array of devices and form factors.
C. Android is an open source, Linux-based software stack created for a wide array of devices and form factors.
D. Android is an open source software stack created for a highly limited array of devices and form factors.
In application theme style, flag windowActionBar (
A. whether the given application component is available to other applications.
B. whether action modes should overlay window content when there is not reserved space for their UI (such as an Action Bar).
C. whether this window's Action Bar should overlay application content.
D. whether this window should have an Action Bar in place of the usual title bar.
To handle an options menu item click in an activity, we usually should override method named:
A. onKey
B. onClick
C. onOptionsItemSelected
RecyclerView is a subclass of ViewGroup and is a more resource-efficient way to display scrollable lists. Instead of creating a View for each item that may or may not be visible on the screen, RecyclerView:
A. creates a single list item and reuses it for visible content.
B. creates an unlimited number of list items and never reuses them
C. creates a limited number of list items and reuses them for visible content.
D. creates a single list item and never reuses it
Why select/choose certbus.com?
Millions of interested professionals can touch the destination of success in exams by certbus.com. products which would be available, affordable, updated and of really best quality to overcome the difficulties of any course outlines. Questions and Answers material is updated in highly outclass manner on regular basis and material is released periodically and is available in testing centers with whom we are maintaining our relationship to get latest material.
![]()
![]()
Copyright © 2004-2025 certbus.com, All Rights Reserved.